VPN Tunnel Configuration
This manual describes how to configure a VPN tunnel to access an external OpenVPN server from the IACBOX.
Hint
In order to use the module VPN Tunnel, it must be licensed separately.
You require at least OpenVPN version 2.3.4, older versions are not supported.
If you encounter problems, then consider to contact OpenVPN consulting services. The IACBOX support can not cover any configuration-related questions of your VPN server.
Creating the OpenVPN Server
You can obtain OpenVPN from the official project website: https://openvpn.net/index.php/open-source/documentation/howto.html
This website also covers detailed information on how to install OpenVPN on different operating systems like Linux, Windows, Mac OSX etc.
Generate Certificates & Keys
In order to use OpenVPN you need to generate certificates and keys for both, the OpenVPN server and the according client (IACBOX). That for this manual describes how to generate self-signed TLS/SSL certificates.
There are many different tools to generate the certificates and keys. We recommend to use Easy-RSA which is a simple OpenSSL front-end to generate certificates and keys for both, Windows and Linux.
Easy-RSA can be obtained here: https://github.com/OpenVPN/easy-rsa
After extracting Easy-RSA switch to the directory easy-rsa/2.0/ where you can find the different build scripts and edit the vars file. Based on the parameters in the vars file, the certificates and keys will be generated. Due to his, edit/enter the following important parameters in the vars file:
- export KEY_SIZE=2048
The KEY_SIZE should be at least 2048. For enhanced security you can also increase the KEY_SIZE to 4096.
- export CA_EXPIRE=3650
The CA_EXPIRE defines in how many days the root CA key will expire. For some Eays-RSA installations this is set to 1 year as default so make sure to check this vlaue.
- export KEY_EXPIRE=3650
The KEY_EXPIRE defines in how many days the created certificates will expire. For some Easy-RSA installations this is set to 1 year as default so make sure to check this vlaue.
- export KEY_COUNTRY
The two letter ISO code for the country where your organization is located. For example us or gb.
- export KEY_PROVINCE
The state/region where your organization is located. This should not be abbreviated.
- export KEY_CITY
The city where your organization is located.
- export KEY_ORG
The legal name of your organization. This should not be abbreviated and should include suffixes such as Inc, Corp or LLC.
- export KEY_EMAIL
An email address used to contact your organization.
- export KEY_OU
The division of your organization handling the certificate.
- export KEY_NAME
The name of the generated key. For example iacbox.
Save the changes you made for the vars file. Note that the commands below refer to a Linux system. First run the following commands to initialize the public key infrastructure (PKI):
1 2 | . ./vars
./build-ca
|
In order to generate the certificate and key for the OpenVPN server, run the following command. As server-name you can select an own name, for example vpnserver.
1 | ./build-key-server server-name
|
Continue with Enter and confirm following questions with y:
1 2 | Sign the certificate? [y/n]: y
1 out of 1 certificate request certified, commit? [y/n]: y
|
The next step is to generate the certificate and key for the client. Therefore run the following command. as client-name you can select an own name, for example iacbox01.
1 | ./build-key client-name
|
Again continue with Enter and confirm following questions with y:
1 2 | Sign the certificate? [y/n]: y
1 out of 1 certificate requests certified, commit? [y/n]: y
|
The last step is to generate a Diffie Hellman prime.
1 | ./build-dh
|
- By now the following files should have been created:
ca.crt - Needed by the server and all clients, serves as Root CA certificate.
ca.key - Needed by the key signing machine only, serves as Root CA key.
dh{n}.pem - Needed by the server only, serves as Diffie Hellman prime.
vpnserver.crt - Needed by the server only, serves as server certificate.
vpnserver.key - Needed by the server only, serves as server key.
iacbox1.crt - Needed by the IACBOX client 1, serves as client certificate for just this client.
iacbox1.key - Needed by the IACBOX client 1, serves as client key for just this client.
For a more secure version you can optionally use an TLS-auth key. Generate it with:
1 | openvpn --genkey --secret ta.key
|
All the generated certificates and keys are stored in the keys directory. In order to use them with OpenVPN, copy the keys directory to the OpenVPN directory where the OpenVPN server daemon runs. On linux this tends to be /etc/openvpn and on windows it is usually C:Program FilesOpenVPNconfig.
Hint
Note that usually Easy-RSA sets the file permissions automatically, keep the .key files secure and protected.
OpenVPN Server Configuration
Open the OpenVPN configuration file and edit/check the following parameters:
- port 1194
The OpenVPN default port is set to 1194. If there is a firewall in between the OpenVPN server and the clients, be sure to allow the configured port for input, forward and output.
- mode server
If the mode is not set to server per default, change it.
- ca keys/ca.crt
Enter the directory where the CA-file can be found.
- key keys/vpnserver.key
Enter the directory where the server key file can be found.
- cert keys/vpnserver.crt
Enter the directory where the server certificate file can be found.
- dh keys/dh2048.pem
Enter the directory where the Diffie Helmann file can be found.
- ifconfig 172.17.130.254 172.17.130.253
In this example, the 172.17.130.254 is the IP-address for the tun1 interface of the OpenVPN server and the 172.17.130.253 IP-address is used for point-to-point connections.
- ifconfig-pool 172.17.130.1 172.17.130.250
This parameter defines the DHCP pool within OpenVPN clients will receive an IP-address. Please note that the IP-address range 172.17.0.0/17 should not be used for the ifconfig-pool. This IP-address range is already used for other functions of IACBOX.
- route 172.17.130.0 255.255.255.0
This parameter sets a route to the tunnel network 172.17.130.0/24. This route is necessary and needs to be set.
- push route 10.5.5.0 255.255.255.0
This parameter pushes the defined route to the client (IACBOX). Due to this, the client (IACBOX) knows that the network 10.5.5.0/24 can be reached via tunnel default gateway 172.17.130.254.
- client-config-dir ccd
This directory should have been pre-created in the default directory where the OpenVPN server daemon runs. When a new client connects to the OpenVPN server, the daemon will check this directory for a file which matches the common name of the connecting client. If a matching file is found, it will be read and processed for additional configuration file directives to be applied to the named client.
- tls-auth keys/ta.key 0
This optional parameter can be set if an TLS-auth key is used. Attention: the key-direction field [0/1] is a three-state field! If it is set, it has to be set on the server and the IACBOX, or has to be left out on both sides. It’s more secure to use the key direction. On the server-side it has to be 0, on the client 1.
This means that if there is a client (IACBOX) with the common name iacbox1 (or any other common name like for example iacbox1.vpn) you need to create a new file named “iacbox1” (“iacbox1.vpn”). In this file you can define specific parameters which will only be applied to the corresponding client (IACBOX).
For example:
1 | ifconfig-push 172.17.130.98 172.17.130.254
|
This parameter assigns the fixed IP-address 172.17.130.98 to the client (IACBOX) and sets the clients default gateway to 172.17.130.254.
1 | iroute 172.29.0.0 255.255.0.0
|
This parameter sets a client specific route on the OpenVPN server. In this example, a route to the Surf-LAN network of the corresponding client (IACBOX) is set. It is highly recommend to create a seperate file in the ccd directory for each client (IACBOX) connected to the OpenVPN server.
IACBOX Configuration
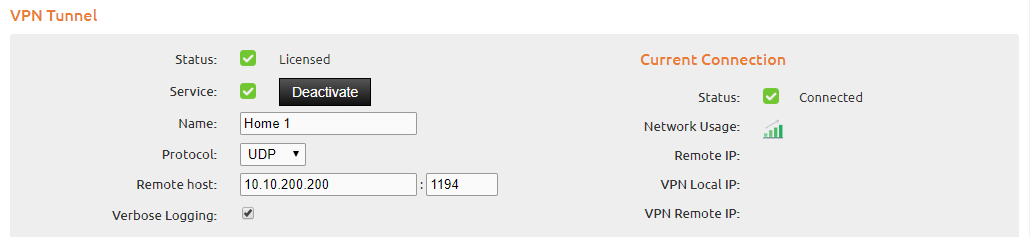
Activate the VPN tunnel in the WebAdmin menu Network / VPN tunnel. First of all, you need to upload the certificate and key files on the IACBOX. You need to upload the ca.crt, client1(iacbox1).crt and client1(iacbox1).key to the system.
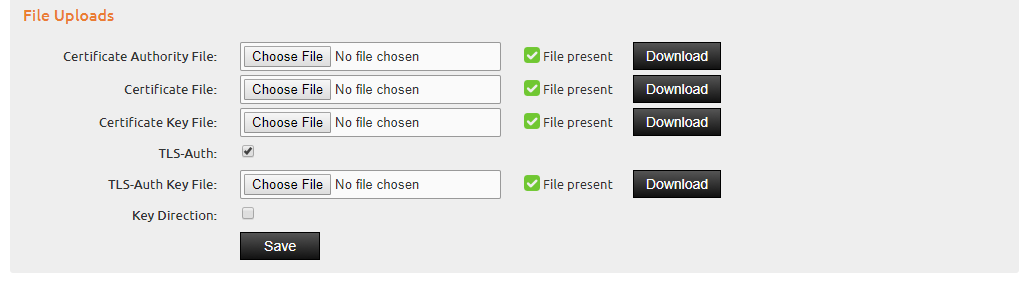
If the optional TLS-Auth function is active on the server side (have a look at the description of the server config above) the ta.key file has to be uploaded here too. If the Key Direction is used on the server side then the checkbox has to be active here too.
Enter a name for the VPN tunnel, the remote host or IP-address and the protocol + port according to your OpenVPN configuration (default = 1194/udp). If the connection was successful, the VPN local IP and VPN remote IP will be displayed on the right.
Routing Protection
- Protect from Surf-LAN
If this is activated, all connections to the VPN tunnel from the Surf-LAN will be blocked.
- Protect from Management-LAN
If this is activated, all connections to the VPN tunnel from the Management-LAN will be blocked.
- Protect routing from tunnel
If this is activated, all connections from the VPN tunnel to the IACBOX Surf-LAN, Management-LAN and/or Office-LAN will be blocked.
However there are certain configurations where you need to disable the protection. For example: You want to allow connections from the VPN tunnel to the Surf-LAN. Therefore you need to define a route to the Surf-LAN on the OpenVPN server. You can do this by editing the according file for the client (IACBOX) in the ccd directory of the OpenVPN server and adding the route with the parameter iroute 172.29.0.0 255.255.0.0. In addition, you need to disable Protect routing from tunnel at the VPN tunnel configuration on the IACBOX.
Access to Services
If the client (IACBOX) is connected, you can access the different IACBOX services from the tunnel. If WebAdmin Access is enabled, it is possible to connect from the VPN tunnel to the WebAdmin of the IACBOX by using it’s tunnel IP-address (e.g. https://172.17.130.98).
In addition to the default access services, it is also possible to grant access to custom ports. For example:
udp:53 → to see if the DNS works
tcp:8080 → check if the proxy server is running
If you want to add multiple ports use blanks as delimiter (e.g. udp:53 tcp:8080).