First Steps
In order to simplify the configuration process of the IACBOX this document will explain a wide array of basic settings step by step.
Hint
- It is highly recommended to read and understand this document prior to installing the IACBOX.
Contents
Hardware Requirements
Before anything else it is important to verify the hardware which the IACBOX will be installed on. There are certain important requirements which must be fulfilled. The list of Hardware Requirements can be found on our homepage or by clicking on this link.
Basic Network Integration
The IACBOX network setup consists of at least 2 networks, the Office-LAN and the Surf-LAN. The Office-LAN grants the connection to the front router or firewall which will be used for the basic internet access of both, the IACBOX itself and guest devices. On the other hand the Surf-LAN is the network for guest devices. Traffic from the Surf-LAN will be managed by the IACBOX. Simplified this means that depending on the settings on the IACBOX a guest device can access the internet over the IACBOX with or without further restrictions.
The Surf-LAN always has to be bridged (except in Routing Mode). This means that devices like Access Points and WLAN Controllers are not allowed to manipulate networktraffic from Surf-LAN devices. Services like DHCP, Proxy-ARP or Proxy-DHCP must be disabled.
Attention
- Best practise is to isolate the whole Access Point management with a custom VLAN, so that AP controllers can communicate with Access Points separated from Surf-LAN clients. This way it is also possible for Access Points to bypass the IACBOX in order to gather updates or communicate with external services (cloud configurations etc.).
With or without Management-LAN
Sometimes network environments do not permitt to add new devices into an existing and complex infrastructure. For exactly this problem the IACBOX can make use of an optional third management interface, the Management-LAN. So if the current network infrastructure does not allow you to add your ticket printers or PMS systems you can move them into the Management-LAN network. Note that the Management-LAN network does require a third physical network card in the IACBOX.

The Management-LAN can be activated with the first installation of the IACBOX and also later on. The exact process is explained in the according documentation page, the Management-LAN Activation.
Preparing the Installation
At first it is required to adjust the BIOS settings of the hardware which will be used for the IACBOX installation.
- The SATA controller must be set to AHCI
- All kinds of network boot options should be disabled
- Both UEFI and legacy BIOS mode are supported
- On HP servers ILO should be disabled
In order to install the IACBOX on hardware or in virtual environments an installation medium is required. We do offer ISO and USB images for every new major release of the IACBOX, which can be downloaded from our homepage. IACBOX partners and system builders may obtain the ISO or USB images via the my.IACBOX customer portal.
The ISO image can simply be burned on an empty CD. In order for USB sticks to work it is required to mount the USB installation medium with a tool. The creation process of a bootable USB sticks is explained on this manual page. After the USB stick was created it is also possible to modify or create new default installation profiles, which will be described in the next section of this manual, the installation.
Installation
Now the installation medium can be used on the new server to install the IACBOX. Note that some systems, for example with existing operating systems, might not boot from the CD/USB stick. To do so manually press the according button to open the boot menu while the hardware is booting up. Usually this works with the F9 or F10 key. Now select the USB stick or the CD-drive.
The exact installation process is being described on this manual page.
Basic configuration
If the IACBOX was installed with a pre-defined unattended profile, the IP address after the installation will be 192.168.1.1 which means the WebAdmin will be reachable with https://192.168.1.1. The configuration of the IACBOX is available in the so called WebAdmin, which can be accessed with your browser of choice.
Attention
- The WebAdmin can initially only be accessed from the Office-LAN side of the IACBOX. In the WebAdmin itself it is possible to enable access for the Surf-LAN and Management-LAN.
- To access the WebAdmin, open https://192.168.1.1 with your browser of choice. Note that the leading https is crucial.
- The default username and password for the WebAdmin login is sysop. The sysop password should be changed after the login by using the My Account button on the top right corner.
After logging in into the WebAdmin it is highly recommended to perform the basic network configuration and to apply the licensing information. Licensing information describes the registration number and registration password you’ve received from the IACBOX sales department.
Attention
- If no licensing information is being applied, the IACBOX will automatically shut down after 6 hours. In order to apply licensing information you will need to proceed with the network configuration which is explained below.
- This does not only apply to the initial registration process. The IACBOX must be connected to the internet at any given time to verify the license.
- If this is not the case, the IACBOX will also shut down after 6 hours.
- Failed online registrations mostly mean that the IACBOX could not reach the license servers. Possible reasons are listed below.
- The internet connection is down or not plugged in
- The configured DNS servers are not resolving properly
- Incorrect system time (and therefore failed certificate checks)
- Missing ethernet interfaces (the IACBOX must consist of at least 2 active network interfaces)
- In some cases, firewalls may block or try to intercept TLS/SSL encrypted traffic. The interception of SSL/TLS has to be disabled for the IACBOX to get a working licensing and update.
So before the licensing process, configure the basic network settings. Therefore navigate to the menu entry Settings / Network.
Configure the used DNS servers to your ISP’s DNS servers.
Attention
- Some public DNS servers like google’s 8.8.8.8 and 8.8.4.4 use rate limiting which limits the DNS replies after a time. If DNS servers do not respond, guests can not use the internet access anymore.
- If the DNS servers are not reachable, the landing page for guests will take very long to load. This is due to the fact that DNS connectivity is being checked upon accessing the customer logon page (landing page).
- Changing DNS servers will require a system restart, which can be done in the WebAdmin menu System / Services. If multiple changes require a restart then it is enough to restart only once at the end.
- The Hostname and Domainname are associated to the installed certificate on the IACBOX. Do not touch these settings if you are not sure.
- The range 172.17.0.0 - 172.17.127.255 is reserved for internal use and can not be used in any configuration.
The next step is to review the Office-LAN configuration. Therefore click on the tab Office-LAN (eth1).
Here you can change the basic network configuration and most importantly the Default Gateway. This can either be a front router or a firewall and should not limit or block the connectivity for the IACBOX. If you previously installed with an unattended profile then you may also want to change the IP address in this window.
Attention
- After changing the IP address do not forget to update existing WebAdmin bookmarks.
- As for all network environments, overlapping network ranges or duplicated IPs are not permitted.
Now click on the tab Surf-LAN (eth0) to review the Surf-LAN configuration.
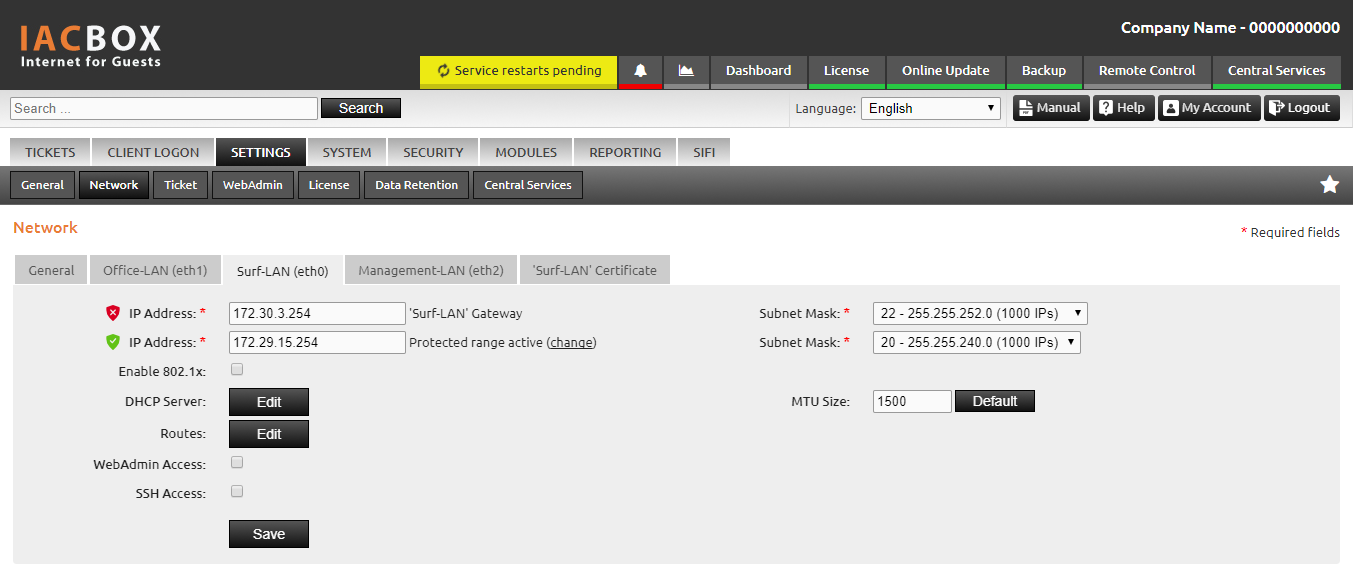
Attention
- The default Surf-LAN configuration is usually perfect as-is and should only be changed if it is absolutely required.
- By default the Surf-LAN uses the Protected range, which does put clients into a subnet so they can not communicate with each other. This also avoids spoofing, so it is recommended to keep this setting. If the unprotected range should be used, then you can disable the Client/Client Protection in the WebAdmin menu Security / General.
- It is not recommended to enable WebAdmin access for the Surf-LAN. For the Management-LAN at the other hand it is common to do so.
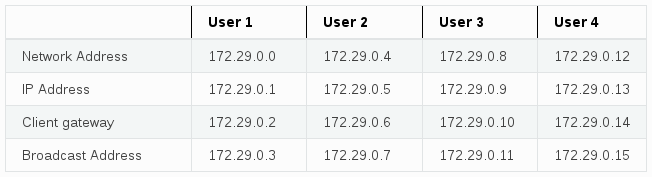
An example of the Protected range Surf-LAN client subnet for the default setting 172.29.15.254/20 (1000 IP addresses):
After this is done and the IACBOX was restarted, it should now be able to connect to the internet. To test the connectivity open the WebAdmin and navigate to System / Tools. Here you can select Ping and perform it on a public domain or IP address, for example 8.8.8.8. If the ping is successful proceed with the next step, otherwise review your network configuration or check your firewall gateway.
Now navigate to the WebAdmin menu Settings / License and fill out the required license fields at the top of the page:
- the registration number
- the associated registration password
- your administrator email address
- the company name and location
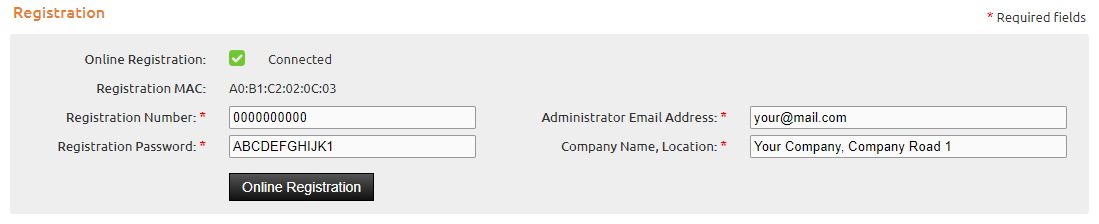
These settings will then be associated to the license. Also the selected MAC address will be used to identify and bind the hardware onto this license.
Attention
- If the network interface cards change, then the MAC address needs to be unlocked by hand. This must be done manually by the system reseller or the IACBOX support team.
- In case the licensing does not work, check your firewall. The IACBOX must have unrestricted access. Also heuristic firewall intrusion detection algorithms can cause the online registration to fail.
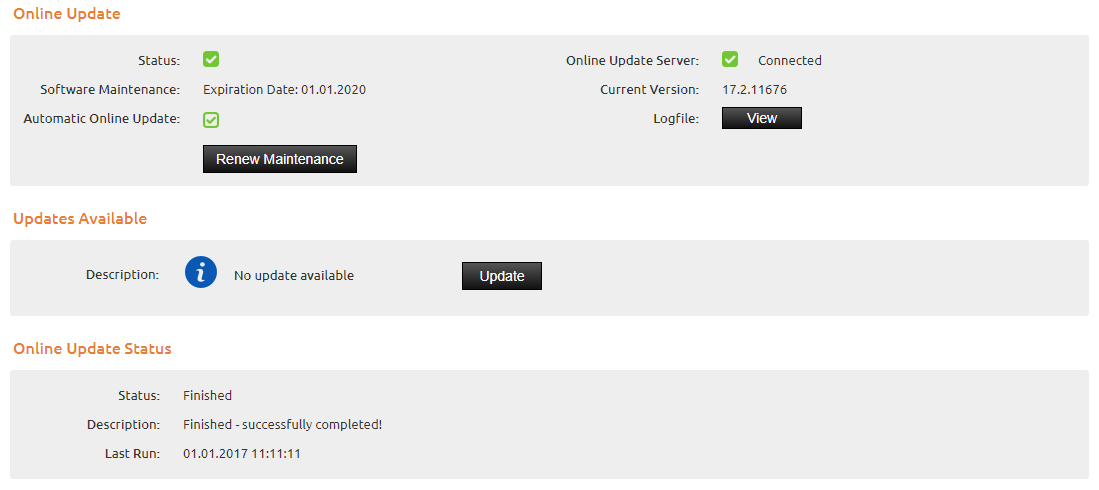
After the licensing process the IACBOX will require a system restart, which can be done in the WebAdmin menu System / Services. Now it is highly recommended to start the Online Update in the according WebAdmin menu System / Online Update, but before doing so note the following hints:
Attention
- The Online Update will download, extract and install all available updates one-by-one. The IACBOX will, if neccessary, perform a system restart, wait 10-15 minutes, and then continue to install the next update. Depending on the amount of available updates this process can take a considerable amount of time.
- The IACBOX will automatically search and install updates before the weekly restart.
- To avoid an inconsistent database and file system the update process must never be interrupted.
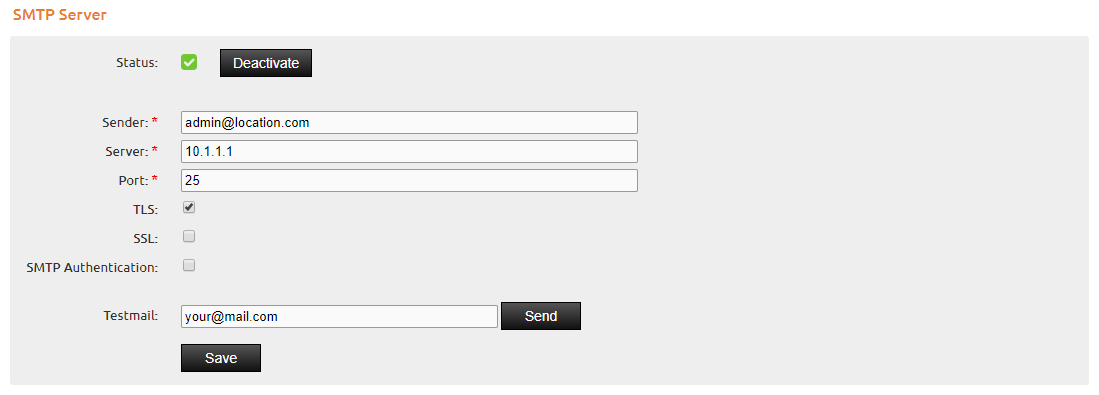
After the update process finished, it is time to continue with the basic configuration. The next step is to configure the SMTP server in the WebAdmin menu Settings / Network. Here you also have the possibility to configure a SMTP proxy, but usually this is not neccessary. By using the Testmail function you can verify your settings and send yourself an Email from within the WebAdmin.
Now navigate to the WebAdmin menu Settings / General. Here you can fill out the Company Name, Website and Address, which will be used in some modules and also the Customer Logon Page (Landing Page) later on.
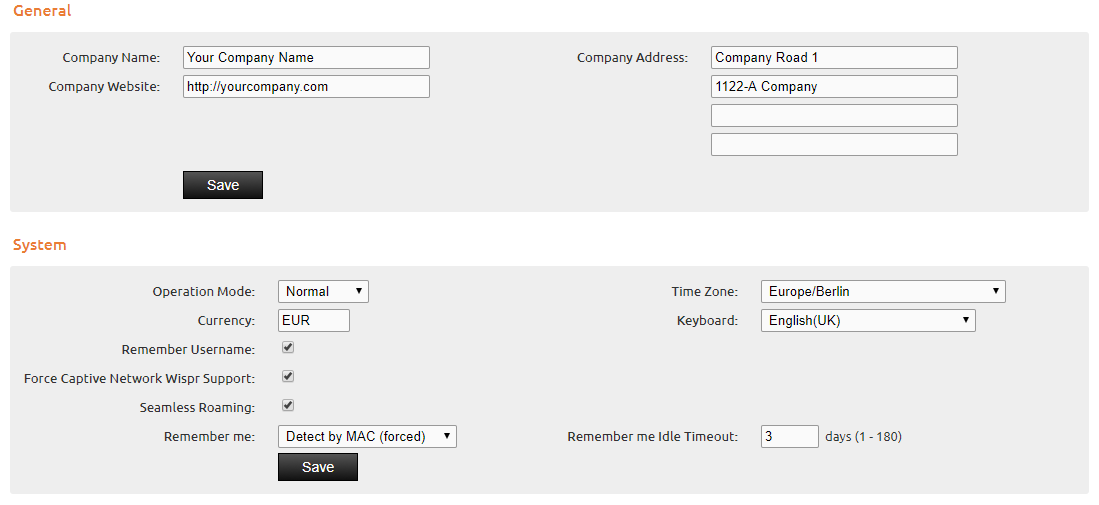
Note that the Operation Mode should not be changed from Normal. The available options Free and Autologon will automatically generate Surf-Tickets for client devices and log them in. These modes are deprecated and should therefore only be used as a last resort. All settings will have an according description in the help menu of this WebAdmin page, which can be found by clicking the help icon on the top right corner. If you are not sure what to configure, then it is recommended to copy the configuration from within the screenshot, because later on it can be applied to pretty much all use-cases.
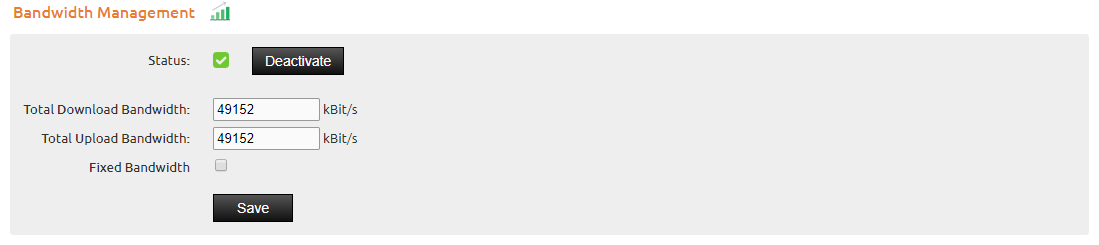
After the IACBOX is now configured with the correct network settings, licensed and up to date, it is time to configure the Bandwidth Management. It is crucial to configure the Bandwidth Management in the WebAdmin menu Settings / Network according to the available on-site bandwidth. To do so, test the bandwidth on-site on different times of the day in order to find the best values to use for Down- and Upload.
Attention
- If the Bandwidth Management does get disabled, there are no more bandwidth regulations which means that every client can use the maximum available bandwidth given by the ISP.
Guest Authentication
The next step is to figure out how to provide Internet access to guests in the Surflan network. The IACBOX offers an incredible wide array of modules and interfaces to cover the most common requirements out-of-the-box. In order for guests to access the internet, a Surf-Ticket is always required. Surf-Tickets can be generated manually beforehand (WebAdmin) or by guests (for example with the Facebook Login). Existing Surf-Tickets will always be listed in the WebAdmin menu Tickets / Manage. In this menu it is also possible to log off or revoke existing tickets.
The following list contains some basic authentication possibilities of the IACBOX:
- Ticket Login with Username and Password or only with a Password
- Login with Facebook, Google+ or Microsoft Account
- Authentication with existing PMS Systems
- SMS Login
- Email Login
- Buy tickets with PayPal
- Authentication with data from various SQL Databases, AD/LDAP and Radius
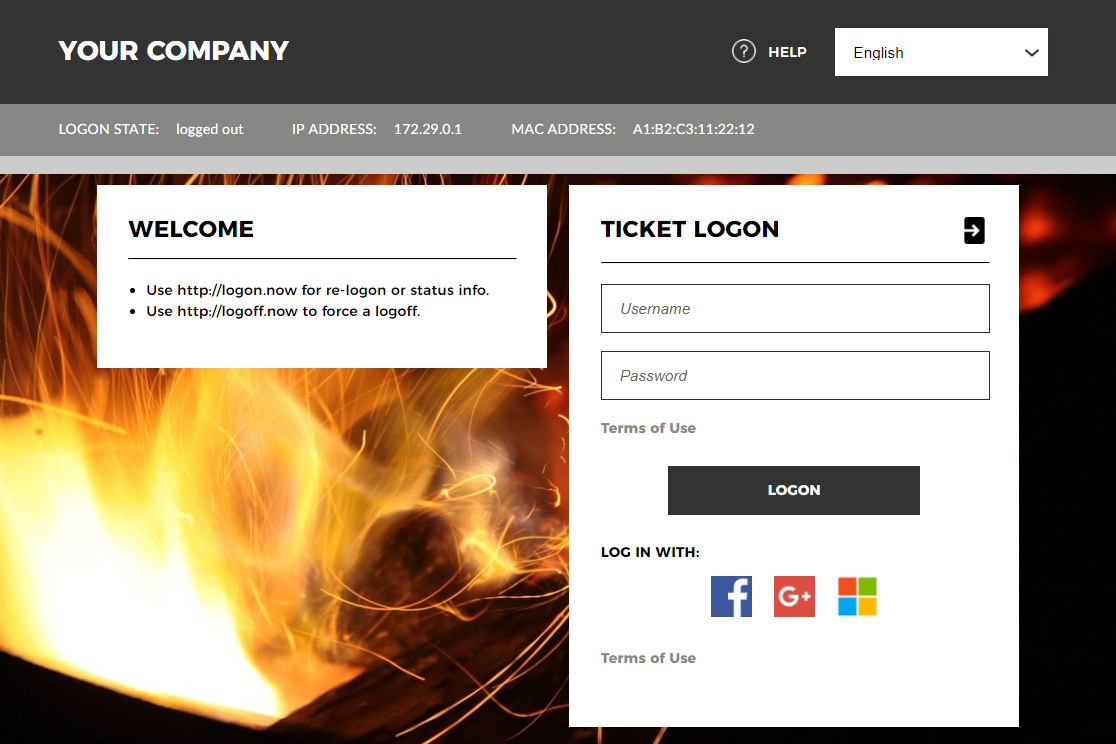
Ticket Login
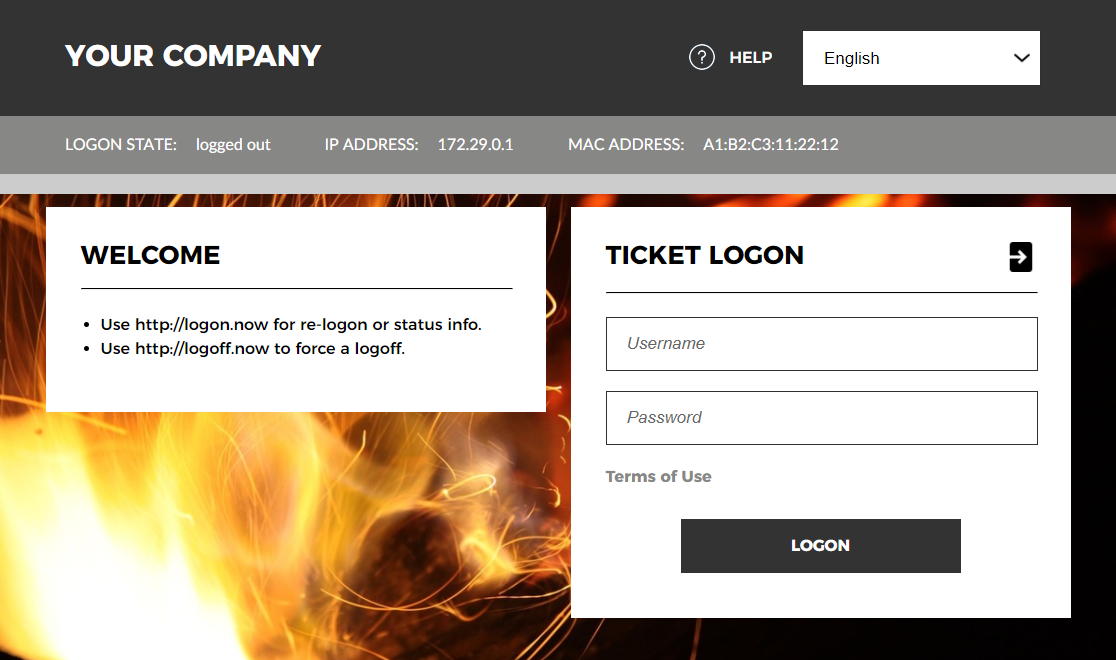
The most common used authentication method in smaller environments is the Ticket Login. This means that guests have to enter a combination of Username and Password - or only a Password (also referred to as PIN Login) on the Customer Logon Page. Tickets can be manually created by administrators in the WebAdmin of the IACBOX using the WebAdmin menu Tickets / Create. By using Ticket Templates you create tickets based on pre-defined default values, so-called templates.
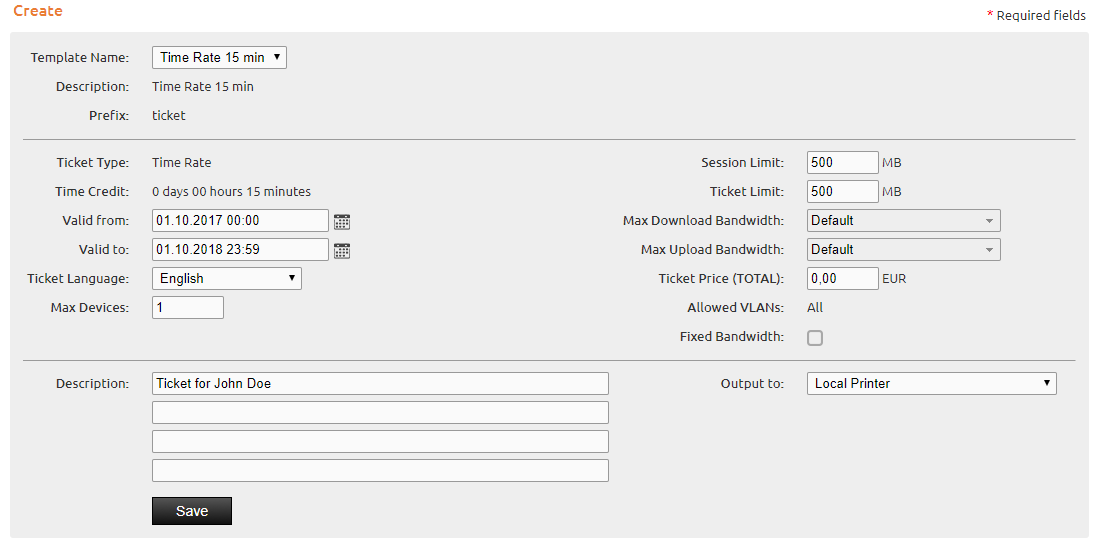
After creating the ticket, it can be printed and given to guests as a hand-out.
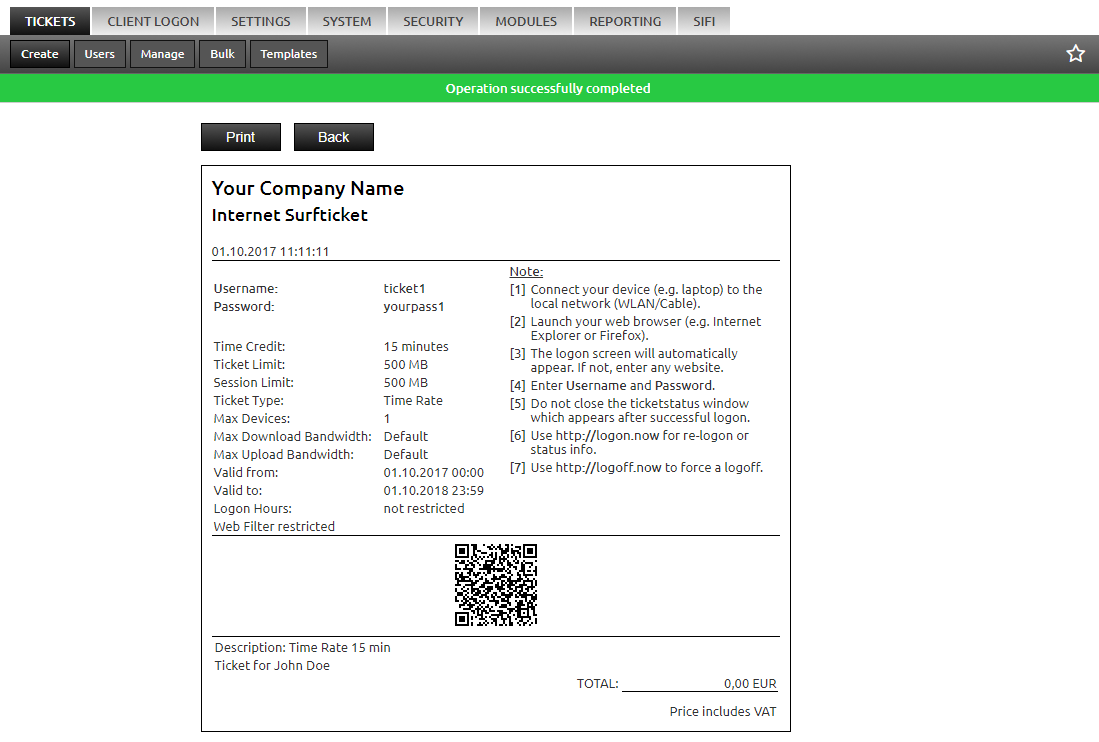
In the Surf-LAN network of the IACBOX guests can now log in by using the Username and Password or by scanning the QR-Code as shown above. Note that the customization possibilities of the Customer Logon Page will be explained later on.
In order to review, add and edit Ticket Templates, navigate to the WebAdmin menu Tickets / Templates. Here you can find the default ticket templates of the IACBOX.
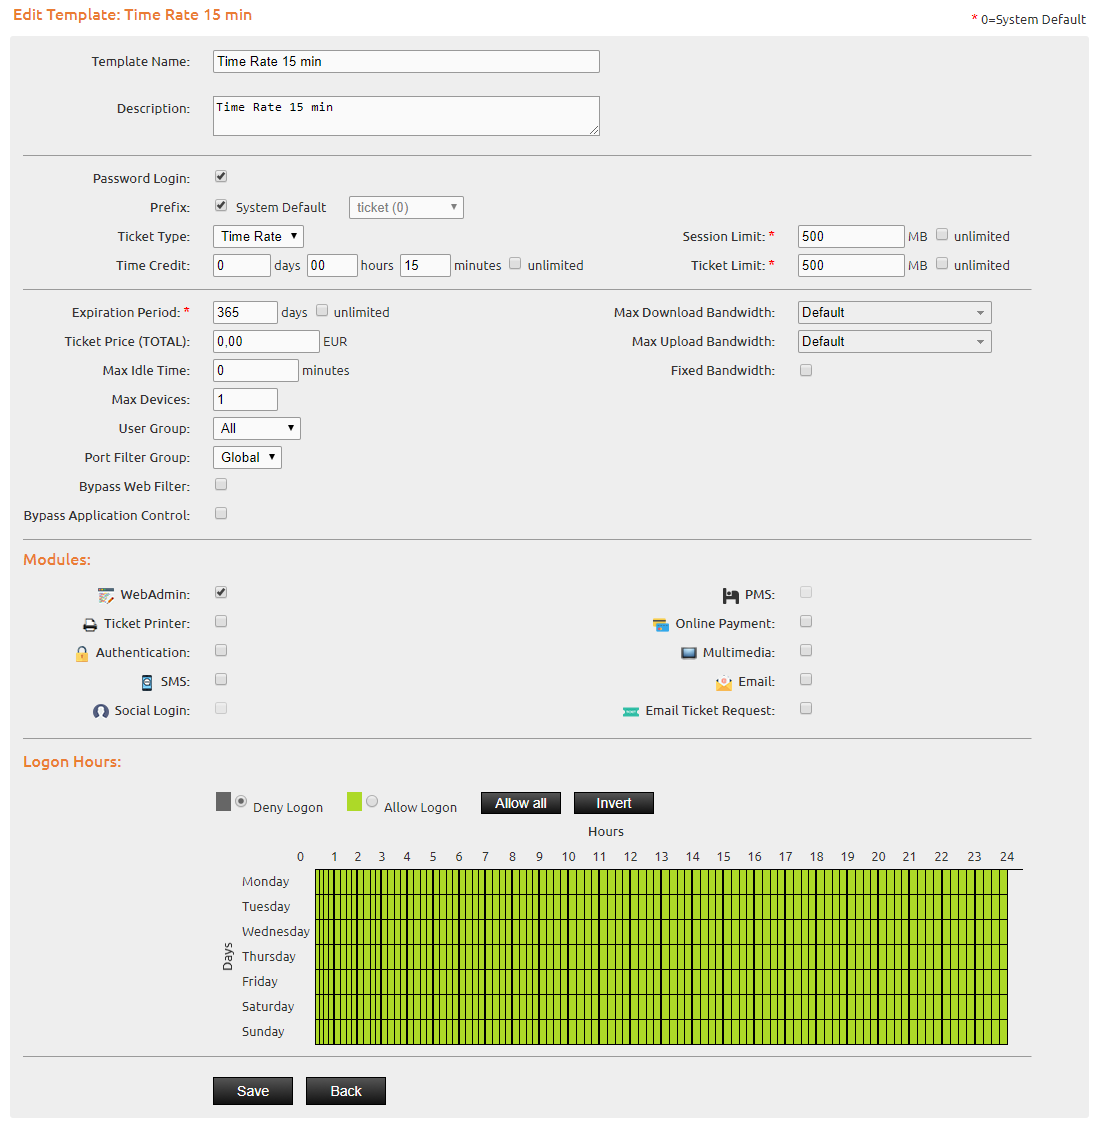
Besides regular restrictions, a template must be enabled for each module to use it with, which means that if you want to use an existing or new ticket template to manually create tickets in the WebAdmin, the checkbox for WebAdmin must be activated.
Attention
- In order to understand ticket values like Time Rate, Flat Rate as well as further possible combinations, it is highly recommended to take a look at the help page of the WebAdmin to explore the meaning of all Ticket Parameters.
PMS Authentication
In a hotel environment often a PMS System is used to keep track of guest check-in’s, check-out’s and bookings. Property Management Systems or short PMS Systems save data like the arrival or departure date, the full name, room numbers or even the birthday of a guest. For guests this information can be used to authenticate with the IACBOX:
While the Room Number is always required, it is possible to combine following data fields for the authentication:
- Name
- Name & Departure Date
- Name & Departure Date & PIN Code
- Name & Birthdate
- Name & Birthdate & PIN Code
- Name & Arrival Date
- Name & Arrival Date & PIN Code
- Birthdate
- PIN Code
Guests then can choose between the available Ticket Templates which are configured for usage with the PMS Module. If ticket templates define a price, an according booking will be sent to the PMS system. This way guests can postpone paying tickets until checking out. The PMS manual can be found here.
SMS Login
The SMS Login enables guests to create a Surf-Ticket by using their mobile phone. In order to receive a SMS with the according login credentials (Username and Password or just Password), the mobile phone number has to be entered on the IACBOX Login Page.
Attention
- An external SMS vendor is required to send the actual SMS. The IACBOX offers a list of supported vendors, see the :doc:’SMS configuration manual <../logon/messaging_sms>`.
Further information can be found in the according SMS configuration manual.
Email Login
The Email Login enables guests to authenticate by using an email address. To receive the login credentials (Username and Password or just Password), an email address has to be entered on the IACBOX Login Page, so that the IACBOX can send an email to this address.
Attention
- After the email address was entered on the IACBOX Login Page, guests will have free internet access for a configured amount of time. This enables guests to access Web-Mails like Gmail or Hotmail without any restriction. Guests then have to log in by using the credentials in the email which has been sent by the IACBOX.
- Besides the ticket credentials the email will also contain a hyperlink which automatically authenticates the user with the attached credentials.
Further information can be found in the according Email configuration manual.
Online Payment via PayPal
Guests can also buy tickets by using the external payment service provider PayPal (PayPal configuration). The payment interface on the Login API also offers different payment providers (although they are not fully tested yet), for example:
- SofortBanking
- Stripe
- WorldPay
- 2CheckOut
- Authorize.Net
For further explaination please refer to the Login API manual pages.
Without the LoginAPI and by only using the old Login Page you can still use PayPal. In order to set up PayPal you may follow the PayPal Integration manual.
External Authentication
The External Authentication module allows you to authenticate guests on the Surf-LAN side by using existing backends:
- Active Directory/LDAP
- MSSQL/MySQL/PostgreSQL
- Radius
- iPass
For further explaination please refer to the External Authentication manual page.
The Landing Page
The landing page is often referred to as “IACBOX Login Page” and lists all enabled authentication methods. There are two very different possibilities to customize the Landing page, the default IACBOX Login Page (left) and the Login API (right).
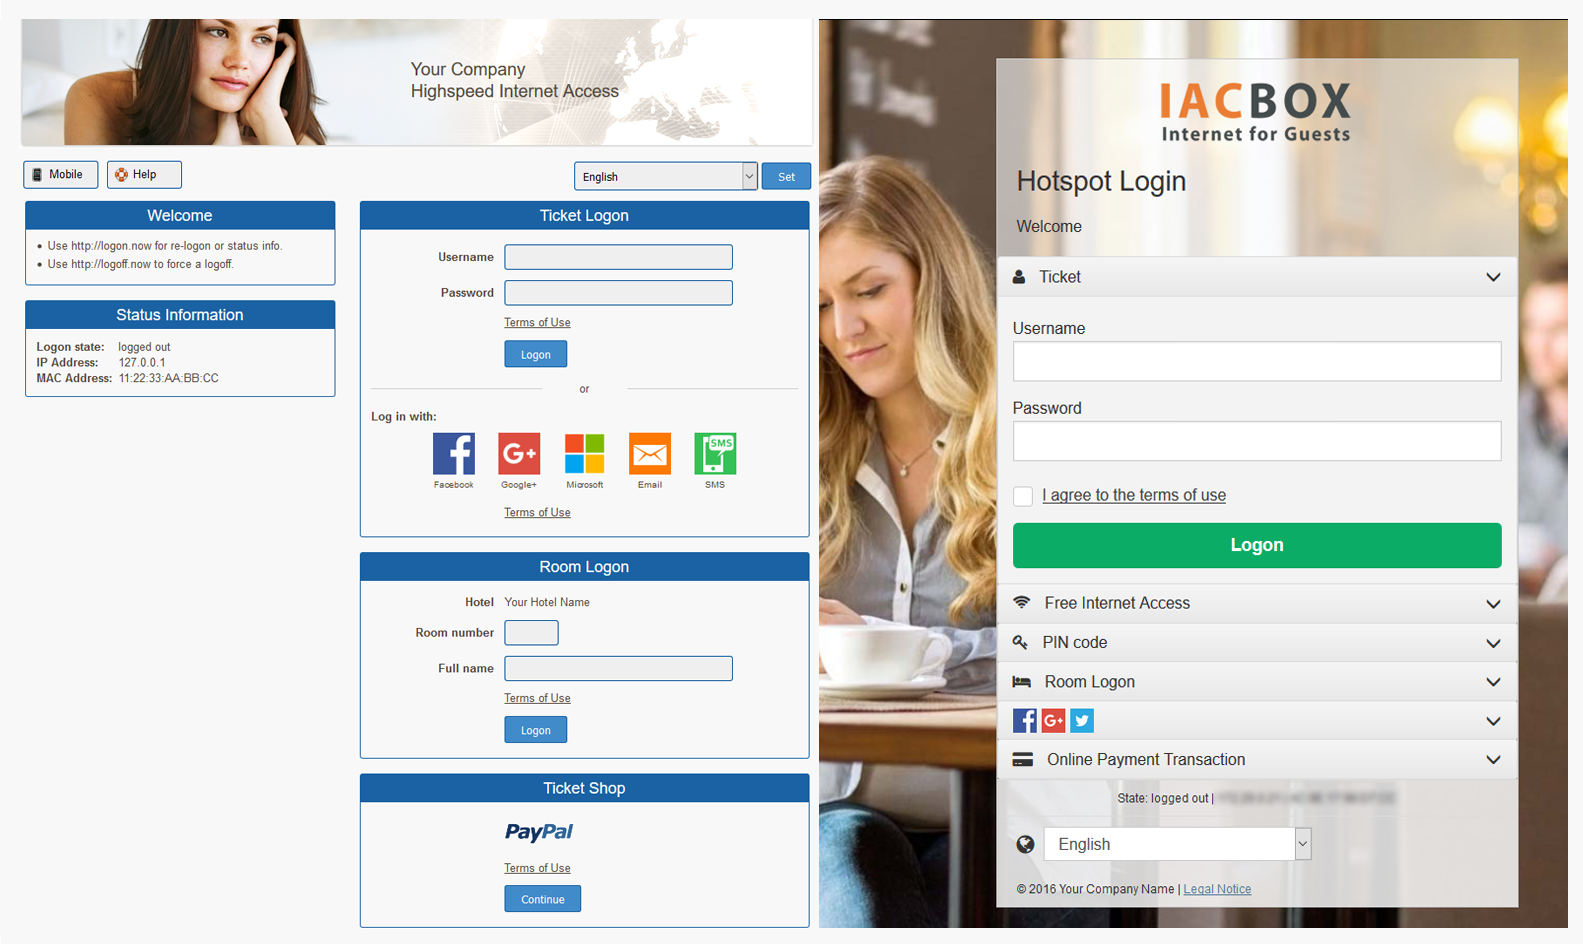
With IACBOX version 17, the new Metro Style was introduced. It can be activated in Client Logon / Design by selecting Metro from the Logon Style dropdown menu.
Customization Options for the IACBOX Login Page can be found in the WebAdmin menu Client Logon / Design. The Login API page is being build upon PHP which means that the design and functionality is completely customizable. Further information can be found in the according manual page for the Login API.
Social Login
The Social Login is probably the most popular authentication on the IACBOX. It does allow guests to authenticate and create a Surf-Ticket by logging in with a social media account. The available Options are:
Attention
Hint