IACBOX Installation
This manual describes how to install the IACBOX. The installation can be performed with pre-defined unattended profiles or in expert mode. For starters it is highly suggested to install the IACBOX with one of the 4 pre-defined unattended profiles.
Hint
- The installation medium of the IACBOX can be downloaded from our homepage and is available as ISO and USB image. To create a bootable USB stick you may follow the instructions on the according manual page which also explains the unattended setup.
- Also note the hardware requirements on our homepage.
Contents
Basic BIOS settings
Ensure that the BIOS settings are configured according to the following points.
- The SATA controller must be set to AHCI
- All kinds of network boot options should be disabled
- The UEFI should be set to Lecacy Mode
- On HP servers ILO should be disabled
Now the installation medium can be used on the new server to install the IACBOX. Note that some systems, for example with existing operating systems, might not boot from the CD/USB stick. To do so manually press the according button to open the boot menu while the hardware is booting up. Usually this works with the F9 or F10 key. Now select the USB stick or the CD-drive.
Starting the Installation
When the systems boots from the installation medium, the first screen of the installation process will ask which mode you want to install with.
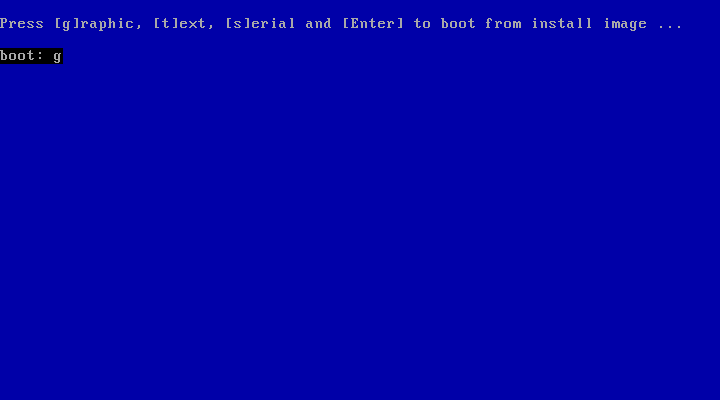
As in the screenshot above, enter g to start the installation in the graphics mode and then confirm with ENTER. The next screen will offer you some further possibilities for the installation.
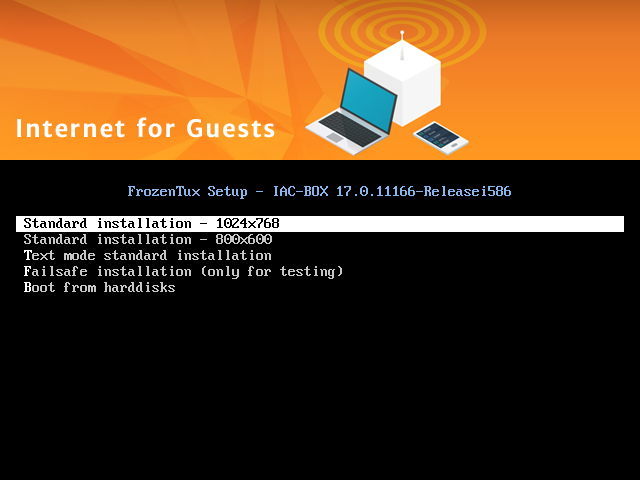
Every regular installation should use the Standard Installation - 1024x768 option. If this fails, you may try the lower resolution alternative or even the Text mode. Note that the Failsafe Mode should never be used if you want to install a productive system. As the name suggests, it should only be used if no other mode works - and even then only to find the problem. The last option will do what it says, Boot from harddisks in case other operating systems are already installed.
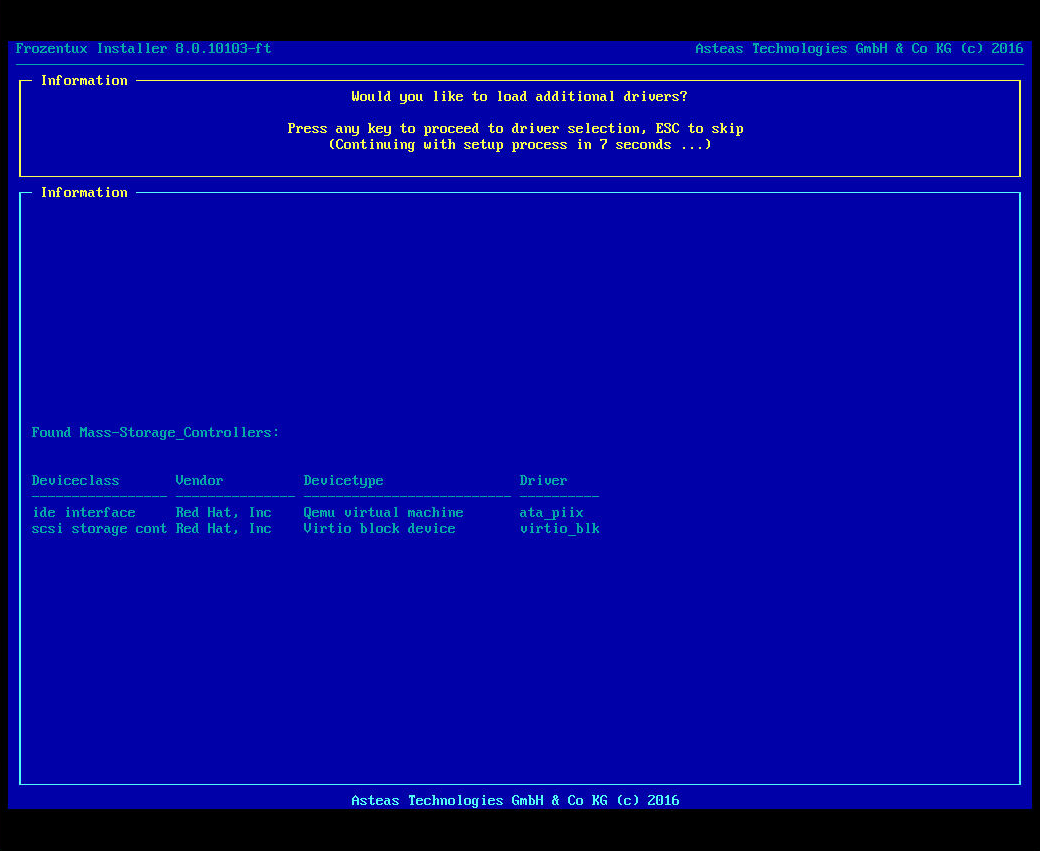
Now the FT-Setup will load up. While loading you will be asked if you want to install additional drivers. Most of the times this is not necessary, so if you are not sure then skip installing additional drivers. Press any key to proceed or use ESC to skip this screen.
Hint
- In order to navigate in the FT-Setup use the arrow keys to nagivate in lists. To highlight/select an entry use the SPACE bar. Use TAB to navigate between the list entries and the save/back handlers. To proceed use the ENTER key.
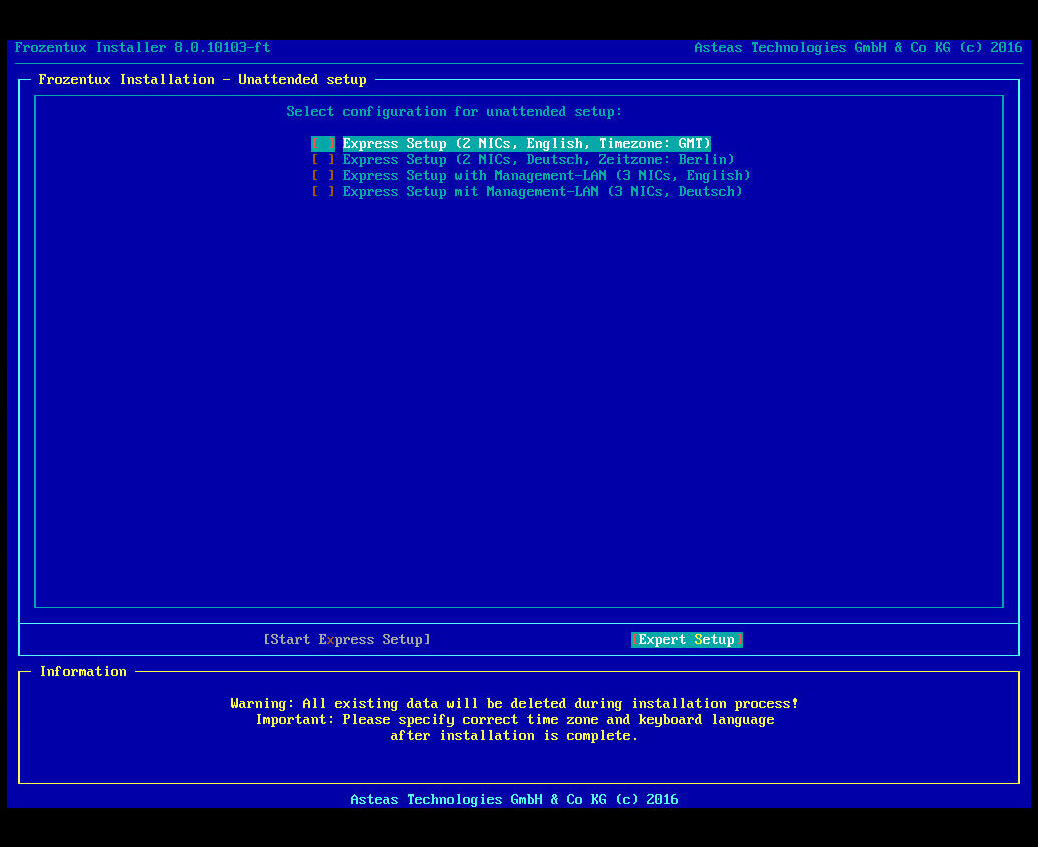
Express Setup
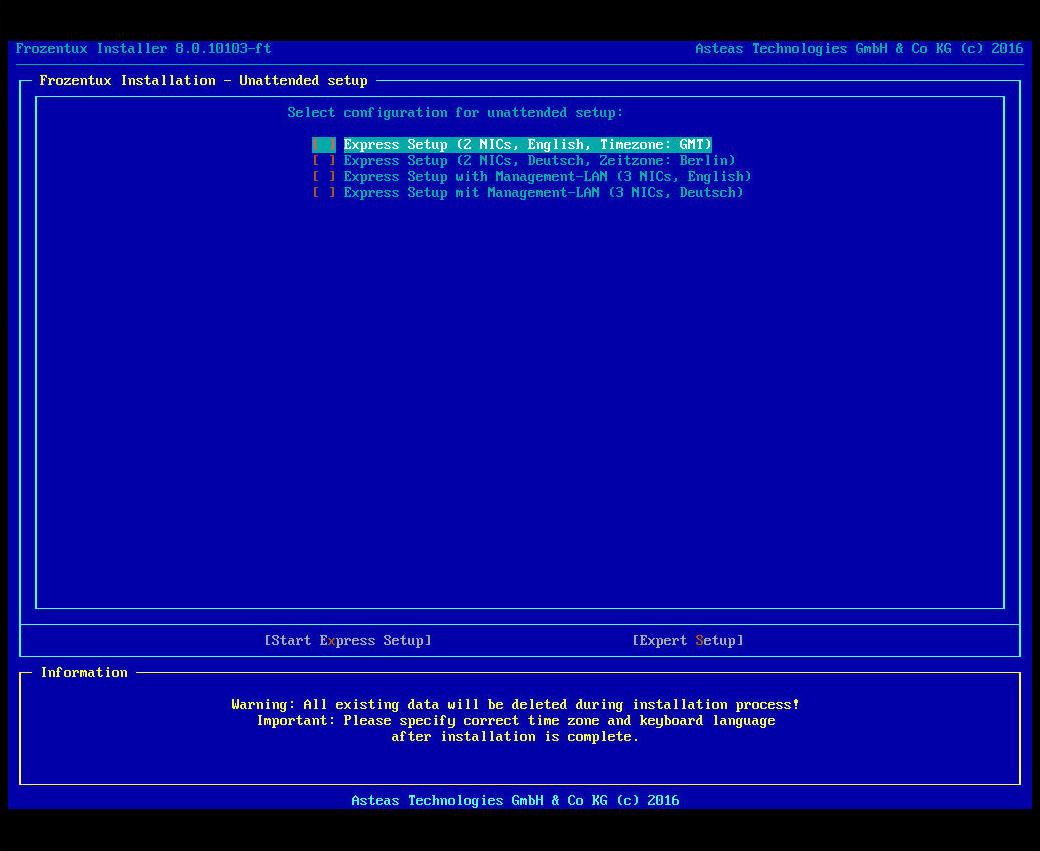
The next step is the Unattended Setup screen. Here you can select an unattended and pre-defined configuration to install the IACBOX with. For starters it is recommended to start with one of the available options, for example the Express Setup with 2 NICs in English. After selecting the entry with the SPACE bar, press TAB to highlight the Start Express Setup section and then ENTER to proceed. The IACBOX will now be installed with default settings. The settings can still be changed later on.
After the installation and the automatic restart, the following options will be available. Please note that this screen will be skipped automatically after 10 seconds.
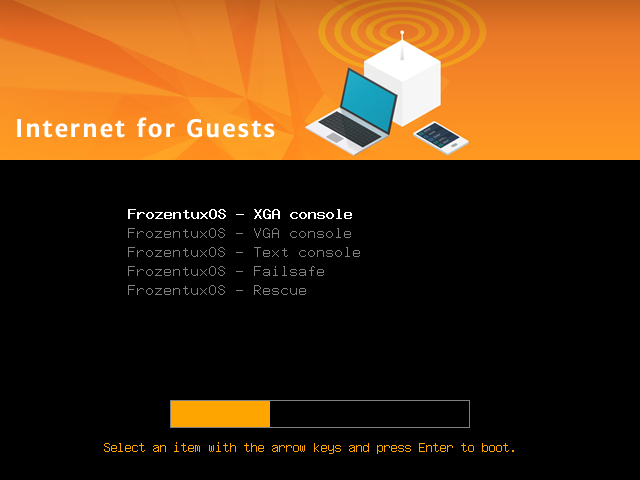
Again you see 2 resolution based settings, the Text Console and the Failsafe Mode. The Rescue Mode allows you to restore defective file systems while the Memory test is a check of the system memory. For a better explanation you may want to review the according manual page for the Rescue Mode.
The IACBOX will now boot up to the following screen, the console is ready for login.
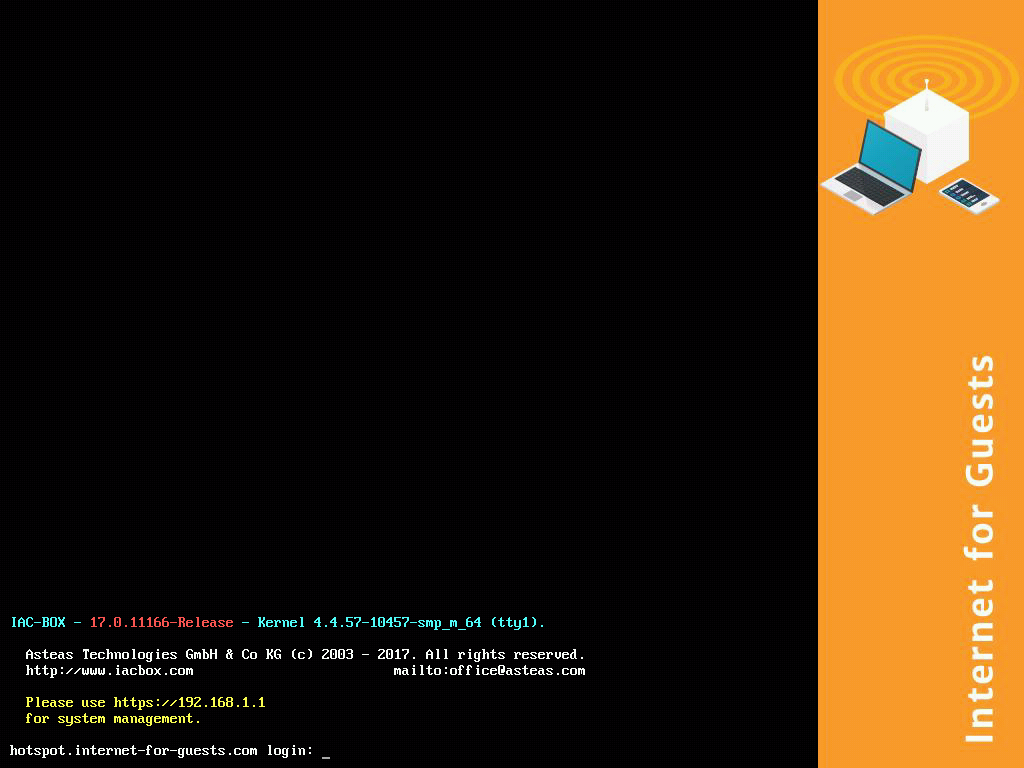
This means that the IACBOX was successfully installed. You have the IP address of the Office-LAN on-screen which can be used in order to open the WebAdmin of the IACBOX. Therefor connect your workstation/notebook to the Office-LAN and open the webpage https://192.168.1.1 with your browser of choice (replace with the IP address you’ve configured which is also visible on the console). Later in this manual we will present how to enable WebAdmin access via Management-LAN or Surf-LAN.
Hint
- The console enables you to change certain network settings. This can be used in case the WebAdmin is not reachable (for example due to wrong network settings). To login, you first need to change the password for the default WebAdmin user sysop, because the login on the console will not work with the default login data (sysop/sysop). In order to change the password for the sysop user log in into the WebAdmin (see above) and click on My Account.
If you log in with the sysop user on the console, you get back into the setup menu. This can be used to change the network settings without accessing the WebAdmin.
Expert Setup
If you want to configure the interface IP addresses, the gateway and DNS servers while installing, then you may as well select the Expert Setup.
Hint
- In order to navigate in the FT-Setup use the arrow keys to navigate in lists. To highlight/select an entry use the SPACE bar. Use TAB to navigate between the list entries and the save/back handlers. To proceed use the ENTER key.
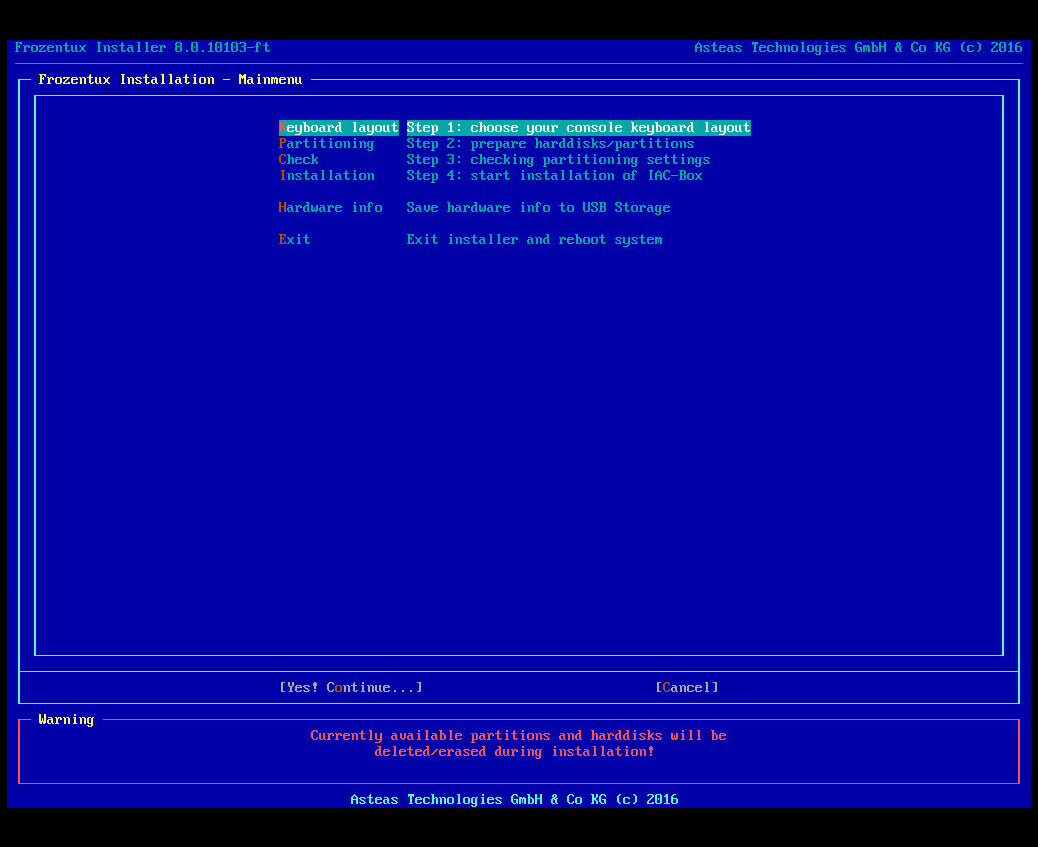
Before installing, you can change the keyboard and partitioning settings. Note that the installation requires you to enter all important menus. After you’ve confirmed the keyboard settings, navigate into the menu Partitioning. Here you will find the installed hard drive and it’s size. To confirm the installation on this hard drive, hit ENTER or select Continue. The installation will then show a summary of the partitions which are required for the IACBOX.
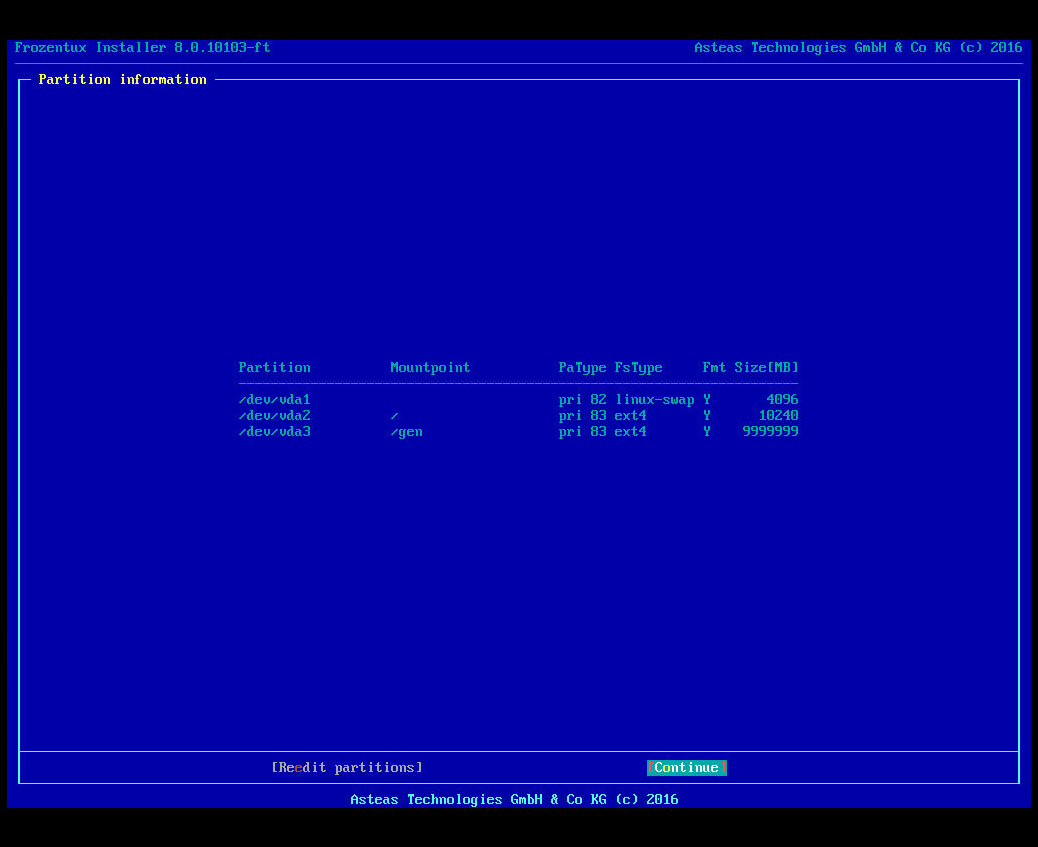
Accept the summary with Continue to get back to the main menu. Now click on Installation to start the process which copies all necessary files to the selected hard drive. This can take some time.
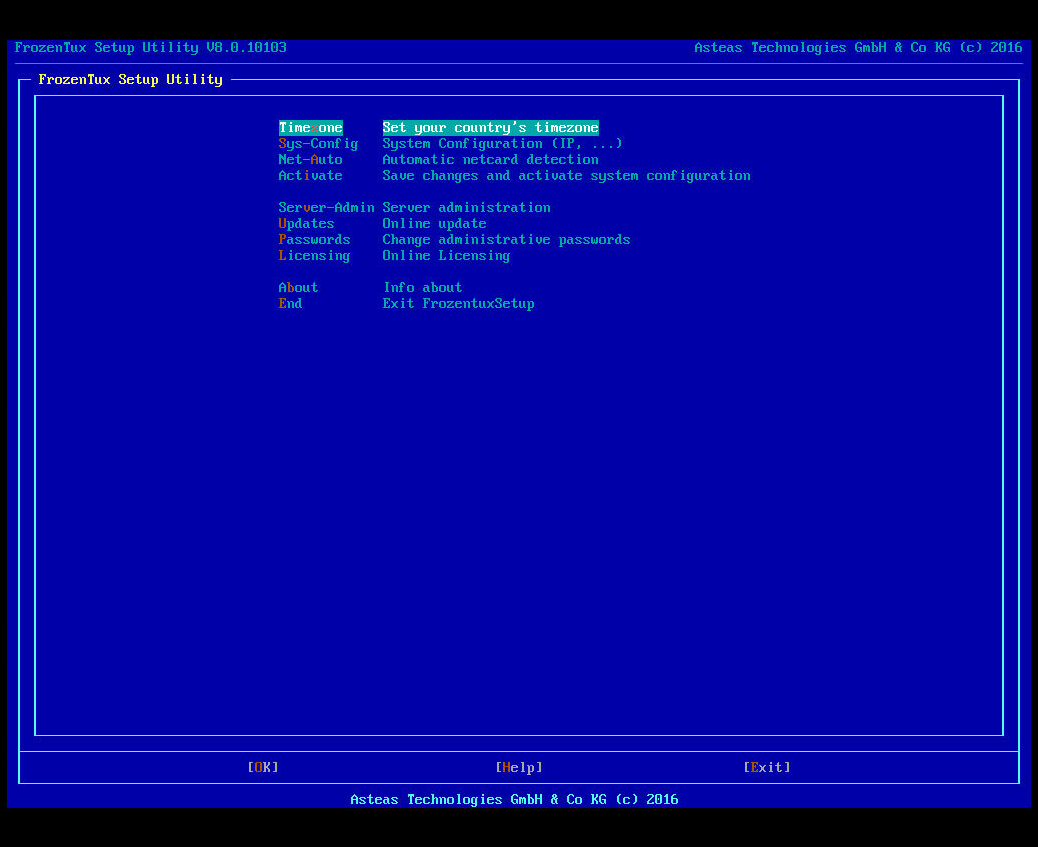
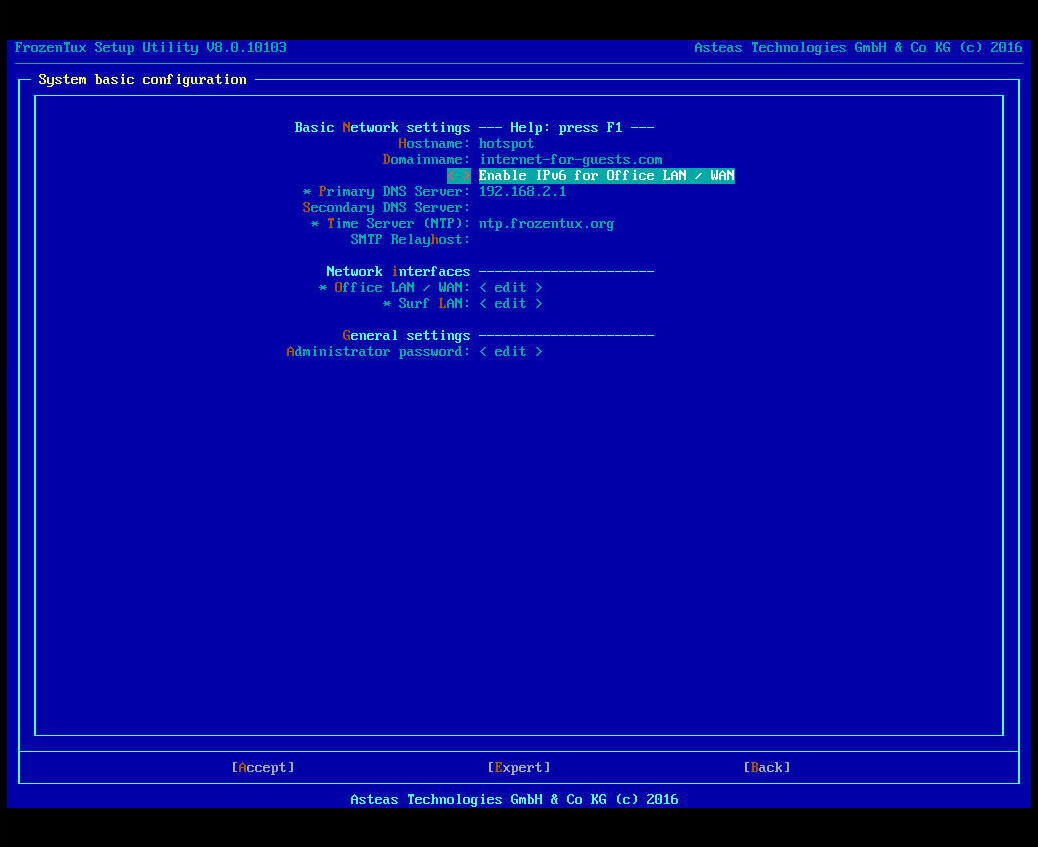
After the copying process is finished you will see the main menu of the basic configuration. Same as with the keyboard settings, first navigate into Timezone and either accept or change the configuration to your liking. Now navigate to Sys-Config. Here you might change the used DNS Servers.
Hint
- It is highly suggested to use the DNS servers of your ISP. Using local firewalls or routers as DNS servers will most likely lead to problems later on.
After configuring the DNS servers navigate into the Office LAN / WAN menu. Here you can change the IP address of the Office-LAN, it’s Subnet mask and the Default Gateway. Note that this must be done by technical staff with according network knowledge.
Hint
- For the Surf-LAN configuration please note that it is highly suggested to use the default configuration. Since the Surf-LAN is an isolated network anyway, it should not matter. The options Enable client2client protection and Disable client AMC address dependency will be explained later on.
Attention
- If you have 3 network cards installed, you will also see the Management-LAN menu entry. In case you want to activate and use the Management-LAN, enter the menu, select enable management LAN by using the SPACE bar. Now use the TAB key to select Accept and confirm it by pressing ENTER once. This must be done before leaving the menu, otherwise the change will not be saved.
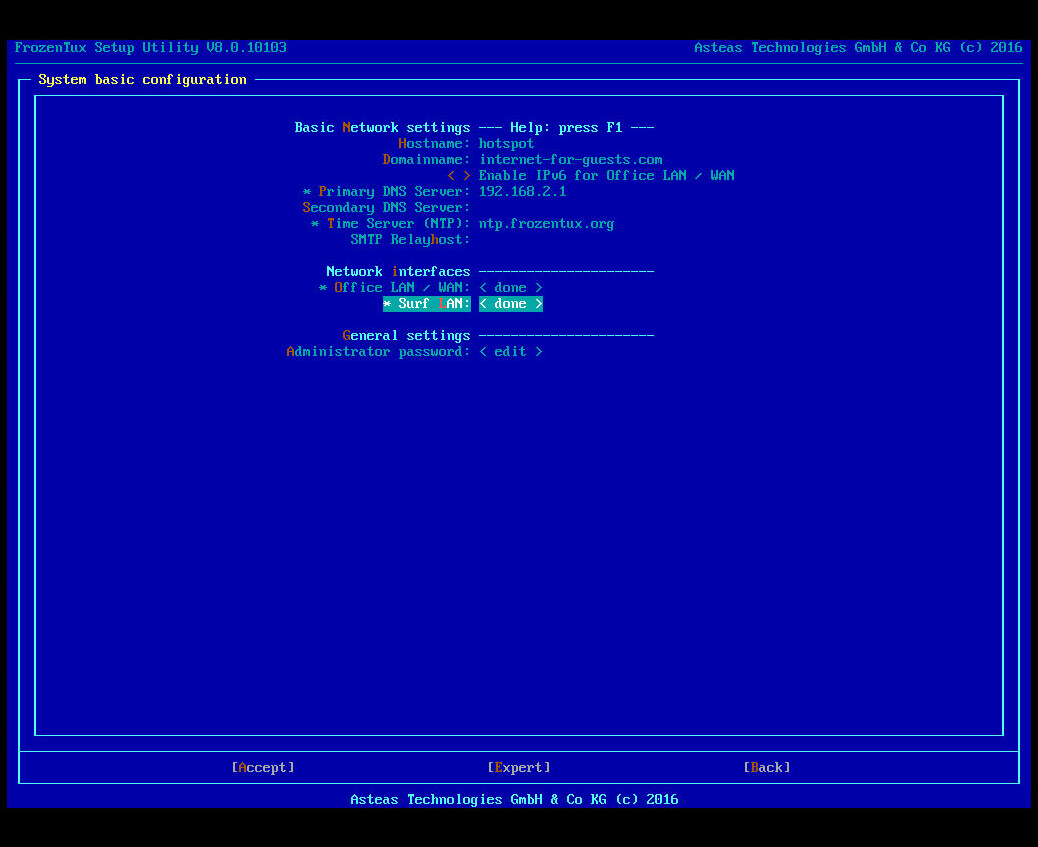
After the Office-LAN and Surf-LAN configuration is done, you will also find a <done> next to the menu entries. In order to get back to the main menu use TAB to highlight Back and confirm with ENTER. Now navigate into the menu Net-Auto. This menu allows you to re-assign the installed network cards to a specific interface of the IACBOX. Even as this is not necessary, the installation requires you to enter this menu in order to verify the amount of detected network cards.
Now navigate back to the main menu, enter the Activate menu and confirm. The installation will now activate the configuration. Afterwards finish by choosing End - Exit FrozentuxSetup, this installs the kernel and prepares the system for the first boot. The system reboots and loads the IACBOX. The bootup is finished as soon as you reach the login console:
This means that the IACBOX was successfully installed. You now see the IP address of the Office-LAN which can be used in order to open the WebAdmin of the IACBOX. Connect your workstation/notebook to the Office-LAN and open the webpage https://192.168.1.1 with your browser of choice (replace with the IP address you’ve configured which is also visible on the console). Later on this manual will explain how to enable WebAdmin access via Management-LAN or Surf-LAN.
Hint
- The console enables you to change certain network settings. This can be used in case the WebAdmin is not reachable (for example due to wrong network settings). To log in on the console, you first need to change the password for the default WebAdmin user sysop, because the login on the console will not work with the default login data (sysop/sysop). In order to change the password for the sysop user log in into the WebAdmin (see above) and click on My Account.
If you log in with the sysop user on the console, you get back into the same setup menu which you’ve seen in the installation. This can be used to change the network settings without accessing the WebAdmin.